Operating Your PC Workstation Remotely
The LAN WorkPlace®
utilities include the XPC utility. This utility is a DOS terminate-and-stay-resident
(TSR) program that lets a remote VT100, VT220, X terminal or server (X.11R4),
or workstation running a terminal emulation program access your workstation
and run character-based DOS applications.
Running the XPC
utility on your workstation lets your workstation function as an XPC server.
You can then use TELNET to access your workstation from a remote host.
If you are accessing your workstation from a location away from your office,
you might need to use a modem and dial in to the UNIX host with which your
workstation is networked.
Once you access
your workstation, you can run DOS programs on your workstation from the
remote terminal just as if you were using a terminal directly connected
to your workstation. While you operate your workstation remotely, XPC dynamically
updates your remote terminal display to match the display at your workstation.
The VT220 keyboard substitutes for the workstation keyboard, and the information
displayed on the workstation screen by the DOS program is displayed simultaneously
on your terminal screen. The only differences between the remote and local
operations are the methods you use to enter PC-specific keystrokes, such
as <Ctrl> and <Alt> key sequences.
Operating an XPC
Workstation

In addition to
accessing your own workstation, you can access and operate other workstations
that are running the XPC utility. This feature enables you to run a DOS
program that resides only on another PC workstation.
If you are a
system administrator, you can use XPC for troubleshooting problems on workstations
connected to the network that you administer. When a user asks you to fix
a problem with a workstation, you can tell the user to run XPC so that
you can access the workstation from your terminal to diagnose and resolve
the problems.
XPC enables you to
- Let someone else operate your workstation from another workstation or host
- Operate a PC workstation from another workstation or host
- Map XPC screen and keyboard characters to your remote terminal
- Set the user-defined control keys on the remote terminal to simulate <Ctrl> and <Alt> functions on your workstation
- Compile mapfiles so that XPC can reference them
- Specify XPC character sets, fonts, and prompts
XPC has three important limitations:
- XPC allows you to run only character-based DOS applications, such as LAN WorkPlace DOS
applications and the NetWare utilities. You cannot run graphics applications
or graphical user interfaces such as MS Windows or LAN WorkPlace Windows
applications.
- VT100 terminals that connect to XPC do not support international characters. If your application uses international characters, use a VT220-compatible terminal or an X
terminal.
- XPC does not support mouse input. XPC only allows keyboard input to DOS applications.
Running XPC on Your
Workstation
This section explains
how to run XPC on your workstation, obtain XPC status and help information,
and unload XPC from memory. You can carry out each of these activities
by using the XPC command in the following format:
XPC [ -C ] [ -H|-? ] [ -Q ] [ -S ] [ -U ]
The following table describes the options you can include with the XPC command.
XPC Utility Options
| Options
| Description
| | -C
| This option loads
XPC using conventional memory only.
|
| -H | -?
| This option displays
command-line options.
|
| -Q
| This option displays
the XPC status (for example, "active," "not loaded," or "suspended."
|
| -S
| This option enables
you to define special key sequences for control characters. When you include
this option, XPC prompts you to define the system control character, the
key sequence to simulate <Alt>, and the key sequence to simulate <Ctrl>.
|
| -U
| This option unloads
XPC if it is active.
|
Starting XPC from DOS
When you start XPC,
the program prompts you for a password.
The password
you enter prevents unauthorized remote users from connecting to your workstation.
When a remote terminal connects to your workstation, the remote user is
prompted to enter the password you specify. You can include any combination
of alphanumeric characters in this password.
Follow these
steps to run the XPC utility:
- At the DOS prompt, type the XPC command in the following format:
XPC [ -C ] [ -S ]
The XPC program prompts you for a password.
- Type the password and press <Enter>.
If the XPC program loads properly, it displays the following message:
XPC loaded successfully.
Remote users
can now use TELNET or an X server to connect to your workstation and log
into XPC.
Loading XPC in Conventional
By default, the
XPC program tries to load into expanded memory if your workstation is running
EMM 3.0 or later. Otherwise, XPC loads into conventional DOS memory.
If you have EMM
3.0 or later, you can override this default and run XPC in conventional
memory by using the -C command-line option:
XPC -C <Enter>
If you have EMM
3.0 or later installed on your XPC workstation, the XPC utility uses 13
KB of available conventional memory. If you do not have EMM installed,
XPC requires 59 KB of conventional memory space.
Displaying Help Information
Display help information
for the XPC command by typing either of the following commands:
XPC -H <Enter>XPC -? <Enter>
This option displays
information for all XPC command-line options plus basic operating instructions.
It does not load the XPC program into memory.
Determining XPC
Status
Use the following
command to determine whether XPC is loaded into memory and active:
XPC -Q <Enter>
After you enter
this command, the XPC utility displays one of the following messages:
XPC is aliveXPC is not loadedXPC is suspended
The XPC is alive
message indicates that XPC is resident in memory and is ready to accept
client connections.
The XPC is not
loaded message indicates that XPC is not resident in memory. The XPC -Q command does not load XPC into memory; it only queries for XPC status.
The XPC is suspended
message indicates a conflict between the XPC program and another TSR program
subsequently loaded into memory. This conflict prevents XPC from executing.
To use XPC, restart your workstation and reload XPC.
Terminating XPC
You can unload XPC
from memory by typing the following command:
XPC -U <Enter>
If a remote client
is connected to XPC when you enter this command, XPC immediately displays
a session-closed message on the client's remote terminal and closes the
remote session. Any data that the remote client has not saved is lost.
Starting a Remote XPC Session
Follow these steps
to connect a remote terminal or workstation to a workstation running XPC:
- Start TELNET.
When XPC prompts
you for information, respond quickly. If you do not respond within a few
seconds, XPC terminates the connection. If this happens, you can reestablish
the connection by repeating the connection procedure from Step 1.
- From a VT100/VT220 terminal or X terminal, type the following command:
telnet hostname <Enter>
- From a DOS workstation,
type the following command:
TNVT220 hostname <Enter>
Replace hostname
with the hostname or IP address that identifies the workstation running
XPC.
XPC responds
by displaying a list of available character sets for the remote terminal.
- Enter the number
of the character set used by your terminal.
XPC selects option
1 if you press <Enter> without typing a number.
Next XPC prompts
you to type the password specified by the person that loaded XPC on the
workstation.
- Type the password,
and press <Enter>.
After XPC verifies
the password, XPC prompts you for your terminal type.
- Type 1 for VT100,
VT220, or a workstation running TNVT220; type 2 for an X terminal or server.
If you are using
a VT100/VT220 terminal and emulator, you have completed the connection.
XPC displays information about accessing keyboard help information on your
remote terminal, followed by the DOS prompt. You can skip the remaining
steps in this procedure.
If you are using
an X terminal, XPC prompts for more information:
Do you have more than one display (1=yes, 2=no)[2]:
- Type 1 if you
want the remote TELNET session to open an XPC window on an X-terminal display
other than the default display.
If you indicate
that you have more than one display, you are prompted to supply the display
and screen numbers.
In X Window System*
terminology, a display is a monitor with its own attached keyboard. For
example, if you have two monitors attached to a computer, and each monitor
has its own keyboard, you have two displays. This is the situation for
the two monitors on the right side of the figure below. You could also have two physical monitors linked with one mouse. This is the situation for the
two monitors on the left side of the figure below. (In this situation, the left-most
display is showing an extension of the center display. Normally, the user
would have to scroll over or zoom out to see this information on a single
terminal. In this case, it is like having a very large monitor.)
- Enter the display
number for the XPC display.
A prompt for
the screen number appears:
Enter screen number [0]:
- Enter the screen
number for the XPC display.
Example of X Window Displays and Screens:

When you establish
a connection, XPC displays information about accessing keyboard help information,
followed by a DOS prompt.
Closing the Remote Connection
Use the following procedure to terminate your connection to XPC:
Type <Ctrl>+<x>.
Press <q>.
Using the Remote Keyboard
The XPC program
maps the remote keystrokes you type to the keys on the XPC server. Because
the PC keyboard has several specialized keys that may not be present on
remote terminal keyboards, XPC includes special key sequences that enable
you to simulate PC keys from any remote terminal.
You can change
three of these key sequences when you log in to XPC: the <Ctrl> key sequence,
the <Alt> key sequence, and the general-purpose key sequence that you can
use to simulate any of the specialized PC keys. When you first log in to
XPC, XPC displays instructions for accessing information on these key sequences.
The default values are as follows:
Press <Ctrl>+<D>
on your remote keyboard to simulate pressing the <Ctrl> key on the PC keyboard.
Press <Ctrl>+<A>
on your remote keyboard to simulate pressing the <Alt> key on the PC keyboard.
Press <Ctrl>+<x>
on your remote keyboard to simulate pressing the PC function keys, arrow
keys, and edit keys.
You can change
the default <Alt> and <Ctrl> key simulation sequences and set the system
control character by running XPC with the -S option. When you include the
-S option, XPC prompts you to type a control character for each of these
sequences.
The following table lists the general-purpose key sequences that XPC uses.
XPC General Purpose Key Sequences
| Key Sequence
| Description
| | <Ctrl>+<x> then
<q>
| Quits a remote
XPC session.
|
| <Ctrl>+<x> then
<?>
| Displays help
information during a remote session.
|
This table summarizes the default keystrokes used to simulate PC keys from the supported remote terminals.
XPC Key Mapping
Summary
| To simulate these
PC workstation keys:
| Press these X
terminal keys:
| Press these VT220
keys:
| Press these VT100
keys:
| | Characters and
symbols
| Same characters
and symbols
| Same characters
and symbols
| Same characters
and symbols
|
| Arrow keys
| Arrow keys
| Arrow keys
| Arrow keys
|
| <Esc>
| <Escape>
| <Escape>
| <Escape>
|
| <Tab>
| <Tab>
| <Tab>
| <Tab>
|
| Function Keys
|
| <F1> through <F4>
| <F1> through <F4>
| <PF1> through
<PF4>
| <Ctrl>+<x> and
<1> through <Ctrl>+<x> and <4>
|
| <F5>
| <F5>
| <F15> (Help key)
| <Ctrl>+<x> and
<5>
|
| <F6> through <F9>
| <F6> through <F9>
| <F6> through <F9>
| <Ctrl>+<x> and
<6> through <Ctrl>+<x> and <9>
|
| <F10>
| <F10>
| <F10>
| <Ctrl>+<x> and
<0>
|
| <F11> and <F12>
| <F11> and <F12>
| <F11> and <F12>
| No simulation available
|
| Edit Keys
|
| <Insert>
| <Find>
| <Find>
| <Ctrl>+<x> and
<O>
|
| <Delete>
| <Select>
| <Select>
| <Ctrl>+<x> and
<g>
|
| <Home>
| <Insert here>
| <Insert here>
| <Ctrl>+<x> and
<B>
|
| <End>
| <Prev Screen>
| <Prev Screen>
| <Ctrl>+<x> and
<E>
|
| <Page Up>
| <PF1>
| <Remove>
| <Ctrl>+<x> and
<P>
|
| <Page Down>
| <Next Screen>
| <Next Screen>
| <Ctrl>+<x> and
<N>
|
| <Backspace>
| <Backspace>
| <Backspace>
| <Ctrl>+<x> and
<H>
|
| Key Combinations
(Default Settings)
|
| <Ctrl> key combination
| <Ctrl>+<key>
| <Ctrl>+<D> <key>
or <Ctrl>+<x>< C> <key>
| <Ctrl>+<D> <key>
or <Ctrl>+<x>< C> <key>
|
| <Alt> key combination
| <Alt>+<key> (must
be enabled on X server)
| <Ctrl>+<A> <key>
or <Ctrl>+<x> <A> <key>
| <Ctrl>+<A> <key>
or <Ctrl>+<x> and <A> <key>
|
| <Ctrl>+<Alt> key
combination
| <Ctrl>+<Alt>+<key>
or VT220/VT100 method
| <Ctrl>+<D> <Ctrl>+<A>
<key> or <Ctrl>+<x>< C> <Ctrl>+<x> <A> <key>
| <Ctrl>+<D> <Ctrl>+<A>
<key> or <Ctrl>+<x>< C> <Ctrl>+<x> <A> <key>
|
| <Ctrl>+<Shift>
key combination
| <Ctrl>+<Shift>+<key>
or VT220/VT100 method
| <Ctrl>+<D> <Shift>+<key>
or <Ctrl>+<x>< C> <Ctrl>+<x> <S> <key>
| <Ctrl>+<D> <Shift>
or <Ctrl>+<x>< C> <Ctrl>+<x> <S> <key>
|
| <Alt>+<Shift> key
combination
| <Alt>+<Shift>+<key>
or VT220/VT100 method
| <Ctrl>+<A> <Shift>+<key>
or <Ctrl>+<x> <A> <Ctrl>+<x> <S> <key>
| <Ctrl>+<A> <Shift>+<key>
or <Ctrl>+<x> <A> <Ctrl>+<x> <S> <key>
|
| <Ctrl>+<Alt>+<Shift>
key combination
| <Ctrl>+<Alt>+<Shift>+
<key> or VT220/VT100 method
| <Ctrl>+<D> <Ctrl>+<A>
<Shift>+<key> or <Ctrl>+<x>< C> <Ctrl>+<x> <A> <Ctrl>+<x> <S> <key>
| <Ctrl>+<D> <Ctrl>+<A>
<Shift>+<key> or <Ctrl>+<x>< C> <Ctrl>+<x> <A> <Ctrl>+<x> <S> <key>
|
The following
sections explain how to use special key sequences from different terminal
types during an XPC session.
Using an X-Terminal Keyboard
<Ctrl> and <Alt> on
the X terminal keyboard can be used for the corresponding PC keyboard keys.
The X terminal Alt key is disabled on the X server by default and must
be enabled before it can be used with XPC.
If you want to
use the X terminal <Alt> to substitute for the PC keyboard Alt key, use
the X utility xmodmap to enable this key on the X server. You can add either
the left Alt key (Alt_L) or the right Alt key (Alt_R) to any of five key
modifier names (Mod1 through Mod5) in the modifier key map.
For example,
to activate the left Alt key for use with XPC, enter the following command
on your X server:
xmodmap -e "add Mod1 = Alt_L"
You can also
use the VT100 and VT220 special key sequences discussed in the following
section from an X terminal keyboard.
Using a VT100 or VT220 Keyboard
VT100 and VT220
terminals do not have Alt keys. For this reason, a special key sequence,
by default <Ctrl>+<A>, simulates <Alt>.
For example,
if the DOS application calls for you to press <Alt>+<A>, follow these steps:
- Press <Ctrl>+<A>.
- Press <A>.
Because most
of the control keys on VT100 and VT220 terminals are reserved, you can
also use a control sequence to simulate the PC <Ctrl>. The default sequence
is <Ctrl>+<D>.
For example,
if the DOS application calls for you to press <Ctrl>+<x>, follow these steps:
- Press <Ctrl>+<D>.
- Press <x>.
The general-purpose
control key can be used to simulate <Ctrl>, <Alt>, and <Shift> key sequences.
The default general-purpose control sequence is <Ctrl>+<x>. This sequence
is also used to simulate function keys and edit keys on VT100 terminals.
The following table lists the general purpose key sequences for the <Alt>, <Ctrl>, and <Shift> keys.
XPC General Purpose Key Sequences
| To simulate this
PC key:
| Press these keys:
| | <Alt>
| <Ctrl>+<x> <A>
|
| <Ctrl>
| <Ctrl>+<x>< C>
|
| <Shift>
| <Ctrl>+<x> <S>
|
THis table shows how you can combine general-purpose key sequences with other keys for special functions.
XPC General Purpose Key Sequences Used with Special Functions
| To simulate this PC key:
| Press these keys:
| | <Alt>+<A>
| <Ctrl>+<x> <A> <A>
|
| <Ctrl>+<A>
| <Ctrl>+<x>< C> <A>
|
| <Shift>+<A>
| <Ctrl>+<x> <S> <A>
(or <Shift>+<A>)
|
| <Alt>+<Ctrl>+<A>
| <Ctrl>+<x> <A> <Ctrl>+<x>
<C> <A>
|
| <Ctrl>+<Shift>+<A>
| <Ctrl>+<x>< C> <Ctrl>+<x>
<S> <A>
|
This table shows how you can simulate PC edit and function keys from a VT100 terminal.
VT100 General-Purpose Key Sequences Used for PC Edit Keys
| To simulate this PC edit key:
| Press these VT100 keys:
| | <Insert>
| <Ctrl>+<x> <O>
|
| <Home> (Begin)
| <Ctrl>+<x> <B>
|
| <Delete>
| <Ctrl>+<x> <g>
|
| <End>
| <Ctrl>+<x> <E>
|
| <Backspace>
| <Ctrl>+<x> <H>
|
| <Page Up> (prior
page)
| <Ctrl>+<x> <P>
|
| <Page Down> (next
page)
| <Ctrl>+<x> <N>
|
| <Esc>
| <Ctrl>+<x> <[>
|
| <F1>
| <Ctrl>+<x> <1>
|
| <F2>
| <Ctrl>+<x> <2>
|
| <F3>
| <Ctrl>+<x> <3>
|
| <F4>
| <Ctrl>+<x> <4>
|
| <F5>
| <Ctrl>+<x> <5>
|
| <F6>
| <Ctrl>+<x> <6>
|
| <F7>
| <Ctrl>+<x> <7>
|
| <F8>
| <Ctrl>+<x> <8>
|
| <F9>
| <Ctrl>+<x> <9>
|
| <F10>
| <Ctrl>+<x> <0>
|
VT100 terminals
do not support simulation of the <F11> and <F12> function keys.
Mapping XPC Screen and Keyboard Characters
The following figure illustrates
how the screen display on the XPC server is simulated on a remote terminal
that uses a different character set. A screen mapping file correlates the
PC code for the character displayed on the XPC server screen to a comparable
character that is displayed on the remote terminal screen.

The XPC server
can display graphic characters from the IBM PC character set that are not
available on remote terminals. In this case, the double-box graphic characters
from the XPC server are translated into single-box graphic characters available
in the VT220 character set, resulting in a good simulation of the workstation
screen display.
The same approach
is used to map national character sets between the XPC server and the remote
terminal. The screen mapping files establish the correspondence between
PC characters and remote terminal characters.
XPC screen mapping
files are used to process both the characters input to the XPC server from
the remote terminal and the characters output from the XPC server for display
on the remote terminal screen.
Translating Your Remote Keystrokes
XPC receives the
characters and character sequences that you type at the remote terminal,
translates them into the corresponding PC character codes, and passes them
to the DOS application. To do this, XPC uses a screen mapping file that
correlates the codes produced by the keys you press at the remote terminal
with the codes for PC characters.
In addition to
character codes, DOS and DOS applications require keyboard scan codes to
respond as if you pressed keys on the PC workstation. XPC uses a second
file, the scan code mapping file, to determine which PC keyboard scan code
corresponds to the DOS character code. XPC then supplies DOS or the DOS
application with both the character and the scan code, just as if you pressed
a key on the PC keyboard.
This figure illustrates the input translation process:

Translating Output from a PC Workstation
When a DOS application
receives character codes and scan codes, it responds by displaying output
on the XPC server screen. These output characters are received by the XPC
program, which translates them into the corresponding character codes recognized
by your remote terminal. The screen mapping file supplies the translation
table for this display.
The figure below illustrates the following translation process:
A remote client
using TNVT220 types a capital A-umlaut (ä) character by pressing a key
on the remote numeric keypad.
This sends Multinational
code 196 to XPC.
XPC checks the
screen mapping file for character index 196. This index corresponds to
PC character 142, the _ character (which is a physical key on its German
PC keyboard).
The screen mapping
file, 437-MLT.TXT, used in the above search, maps code page 437 on the
XPC server to the Multinational Terminal character set on the remote terminal.
It contains the following line to accomplish the _ key mapping: /196 =
/113g,/142
XPC searches
the SCANCODE.TXT file for PC character code 142 to determine the scan code
for the shifted _ key.
Because a U.S.
keyboard does not have an _ key, the scan code for the _ character in the
default SCANCODE.TXT file is 0.
A German keyboard
does have an _ key, and its scan code for the _ character is 41. The associated
entry in the SCANCODE.TXT file configured for a German keyboard is the
following: /142 = /41/0
XPC passes character
code 142 and scan code 41 to the DOS application.
The application
interprets this input to mean that the shifted _ key has been pressed.
It responds by displaying _ on the XPC server screen.
XPC refers to
the screen mapping file to determine what character code to send to the
remote terminal.
The _ character
(code 142) maps to Multinational character 196 on your remote terminal.
XPC sends character 196 to the remote terminal. /142 = /196 /32
The screen on
the remote terminal displays the A-umlaut (Ä).
XPC Character Mapping Process:

Working with XPC Screen Mapping Files
Screen mapping files
correlate the PC code page loaded on the XPC server, the type of remote
terminal you are using (VT100/VT220 or X terminal/server), and the character
set you are using on the remote terminal.
A set of mapping
files for commonly used combinations of these three elements is provided
in the \NET\HSTACC directory. You can modify these files to accommodate
local configurations.
The first three
digits of the screen mapping filenames identify the XPC server code pages
being mapped to remote terminal character sets. The code pages mapped by
the files provided are as follows:
- 437 - Standard U.S.
- 850 - ISO LatinI
- 860 - Portuguese
- 863 - Canadian-French
- 865 - Nordic
The names of
compiled screen mapping files stored in the \NET\HSTACC directory follow
a naming convention that identifies both the workstation code page number
and the remote terminal character set. XPC uses this convention to determine
which screen mapping file to use from information you supply about the
remote terminal type. See "Character Set Name and Description" on page
8-32 for details of how XPC uses the PROMPTS.TXT file to make this determination.
Once you create
a screen mapping file using a text editor, you must compile it so XPC can
read and understand the mapping. You can compile screen mapping files with
the SMAP utility.
XPC Screen Mapping File Structure
XPC screen mapping
files use the ASCII table for character mappings, plus supplemental codes
to support 8-bit character sets. Each character and keypress is represented
by a decimal number from 0 to 255. (The standard ASCII codes are characters
0 through 127. Characters 128 through 255 are supplemental codes.)
Each screen mapping
file includes one line for each ASCII character and supplemental code.
Each line contains three parts:
The decimal character
code from the code page being mapped, preceded by a slash (/) and followed
by an equal sign (=)
The corresponding
decimal display character code for the remote terminal, also preceded by
a slash, and optionally followed by a special character to designate a
graphics character set
The corresponding
decimal keypress code for this character which the remote terminal sends
to the XPC server, preceded by a slash
The following figure illustrates the structure of a screen mapping file. It shows how the letter _ (PC character code 196) is mapped to a remote terminal that uses code 113g to represent the letter _ and has an _ key (German keyboard) that generates code 142.

The index character
code (196 or _ ) is the PC character code for _ from the code page mapped
by this screen mapping file.
XPC uses the
index character code in two ways:
When it receives
a keypress code from the remote terminal, XPC finds that code in the first
column (Index Character Code), then sends the DOS application the code
in the third column (key character code).
When a character
is displayed on the XPC server screen (_ in this example), XPC finds that
code in the first column, then sends the remote terminal the code in the
second column.
The character
displayed on the remote terminal (113g) is the character code XPC sends
to the remote terminal when the character _ (196) appears on the XPC server
screen.
The key sent
to XPC (142) is the keypress code produced by the remote terminal keyboard
when index character 196 (the corresponding character on the remote terminal)
is typed.
Valid Symbols for Screen Mapping Files
This table describes the special characters included in the XPC screen mapping files.
Special Characters Used in XPC Screen Mapping Files
| Special Character
| Description
| | #
| Comment lines
can be included in the file with the # character. Everything after the
# sign on the line is ignored by the SMAP compiler.
|
| /
| The / character
must precede each decimal number in the mapping tables.
|
| =
| The = character
must follow the first number in a mapping line.
|
| g
| This character
can be used in a VT220 screen translation so the VT220 Special Graphics
Character Set is loaded to display a graphics character. The special graphics
characters have codes 0 through 127 inclusive, followed by the letter g.
For example, the following mapping line appears in the file 437-MLT.TXT,
which maps code page 437 to the VT220 Multinational character set:
/179 = /120g /168
Code page 437
character 179 is a graphics character (a vertical line). The standard Multinational
Character Set does not include graphics characters. The graphics characters
are located in another character set, named the Special Graphics Character
Set.
The (g) following
remote character 120 means that when character 179 is displayed on the
XPC server, character 120 in the Special Graphics Character Set, a vertical
bar, should be displayed on the remote terminal screen.
|
| h
| This character
is the same as the (g) character but specifies that the Special Graphics
Character Set should be loaded high over the European characters in the
Multinational Character Set.
A remote VT220
terminal allows two character sets to be loaded at once. The Multinational
Character Set consists of two parts: a lower character set (standard characters)
and an upper character set (European characters). The (h) specifies that
the Special Graphics Character Set should replace the upper character set
(European characters) of the Multinational character set.
If you do not
plan to use European characters, you can improve XPC's performance by using
(h) instead of (g). The use of (h) allows the Special Graphics Character
Set to stay loaded so that no character-set swapping has to occur.
|
| , (comma)
| Commas are optional
separators. For example, the following two lines provide the same mapping
instructions:
/1 = /0 /0
/1 = /0, /0
|
Modifying Screen Mapping Files
Use the following procedure to change the mapping of a keypress on a remote terminal:
- Load the screen mapping file that you want to modify into an editor.
Choose the supplied screen mapping file that is closest to your configuration. For example,
if the XPC server has code page 437 loaded, and the remote terminal (XPC
client) is a VT100 or VT220 using the Multinational or North American Terminal
8-bit Character Set (Decimal), you must modify the 437-MLT.TXT file.
- Look down the
left column until you find the index code that corresponds to the character
code produced by the remote terminal key.
For example,
if pressing the remote terminal key types a period (.), character 46, find
/46 in the left column. In the 437-MLT.TXT file this line is as follows:
/46 = /46 /46
- Modify the third
column of the current line so that the third decimal code is the code produced
by the remote terminal keypress you are remapping.
Continuing the
example, if the period key on your remote terminal sends code 44, you would
change the line to the following: /46 = /46 /44
- Save the mapping file.
Use the following
procedure to change the mapping of a character displayed on a remote client:
- Load the screen
mapping file you want to modify into an editor.
- Look down the
left column until you find the correct decimal value in the XPC server's
character set for the character you want to remap from the workstation
screen to the remote client screen.
For example,
if your remote terminal is displaying the pound sterling sign instead of
the pound sign (#), find the line for # (character 35). In 437-MLT.TXT
this line is as follows: /35 = /35 /35
- Modify the second
(middle) column of the current line so that the second decimal character
code is the character you want displayed on the remote client screen when
the index character in the left column is displayed on the XPC server's
screen.
Continuing the
example, if your remote terminal uses code 163 to display the pound sign,
change the line to the following: /35 = /163 /35
- Save the mapping
file.
Working with the Scan Code File
The XPC scan code
file, SCANCODE.TXT, works in conjunction with the screen mapping file to
translate remote keystrokes to the XPC server.
A key pressed
on a PC keyboard is represented both by a character code and by a scan
code that the keyboard generates and sends to the PC when the key is pressed.
When you press a key on the remote terminal keyboard, XPC first translates
the code generated by that key into the character code that its corresponding
PC key would generate. XPC then needs to determine the scan code for the
PC key that corresponds to the PC character so that it can simulate pressing
a key on the XPC server's keyboard.
The scan code
file associates the PC character codes with the scan codes produced by
the XPC server keyboard. The standard SCANCODE.TXT file has scan codes
for the U.S. keyboard.
The scan codes
vary depending on the type of keyboard attached to the XPC server. Various
national keyboards have different key layouts that enable you to type various
national characters. For example, an XPC server with a German keyboard
must change the standard scan code table to include the A-umlaut character
(_ ), because the German keyboard has a key (and therefore a scan code)
for typing this character. (The U.S. keyboard does not have this character.)
The following figure is an example of a scan code file entry. It shows how the scan codes are defined for the letter a (PC code 97), which has scan code 30 on a U.S. PC keyboard.
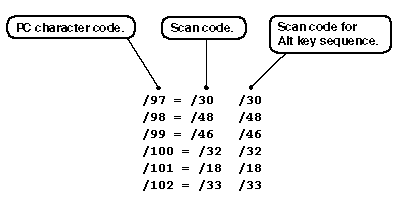
The PC character
code (97) is the PC code for the character you type (the letter a).
The first scan
code (30) is used in conjunction with the PC character code to simulate
a keypress on the XPC server's keyboard.
The scan code
is 0 if the key is not present on the XPC server's keyboard. For example,
the _ character has a scan code of 0 for an XPC server with a U.S. keyboard.
The second scan
code (30) is generated when you hold down <Alt> and press the given key
(97).
On a remote X
terminal, you press <Alt>+<A>; on a VT100 or VT220 terminal or emulator,
you press the special control key followed by <A>. (See "Using a VT100 or
VT220 Keyboard" for information on simulating <Ctrl> and <Alt>
from remote terminals.)
<Alt> scan codes
are specified because the PC keyboard generates different scan codes for
some keys when they are pressed with <Alt>. (Pressing a key with <Ctrl> produces
the same scan code as pressing the key by itself.)
The following
example describes how to change the scan code table for a German keyboard.
The PC code for
capital A-umlaut (Ä) in code page 437 is 142. The scan code for _ needs
to be changed in the SCANCODE.TXT file because the German keyboard has
an _ key.
Initially, the
scan code line for _ is as follows:
/142 = /0 /0
If the scan code
for _ is the decimal number 41 for a German keyboard, the above line should
be changed as follows:
/142 = /41 /0
Note that to
define this key completely, you would also need to modify the scan code
for the unshifted _ key (the ä character, PC code 132, which has scan
code 40 on the standard German keyboard). Other changes would also be necessary
to accommodate additional German keyboard differences.
The scan code
file needs to be changed only for European keyboards attached to the XPC
server. The SCANCODE.TXT file has no effect on keyboards attached to remote
clients. The screen mapping file translates the keystrokes from the remote
client.
Compiling XPC Map Files with the SMAP Utility
The XPC Screen Mapping
Compiler (SMAP) is a DOS command-line utility that reads a screen mapping
file or SCANCODE.TXT file and creates a machine-readable output file. This
output file is used by XPC to perform screen and key translations.
The SMAP compiler
names the output file by replacing the .TXT extension of the input file
with a .MAP extension for the output file.
To use SMAP, specify the input filename and extension on the command line:
SMAP filename.ext <Enter>
The following
example reads the file 437-TEST.TXT and creates a file called 437-TEST.MAP
that can be used as a screen translation file for an XPC session.
SMAP 437-TEST.TXT <Enter>
You can include
the -? command-line option to list the SMAP command-line options.
XPC Remote Character Sets and Prompts
Because different
remote X terminals have different resident character sets and fonts, XPC
prompts the remote user when logging in to choose the character set for
XPC to use. XPC provides a text file, PROMPTS.TXT, that you can modify
to reflect the character sets in use by X terminals on your network. You
can also edit this file to translate or customize the XPC prompts and messages.
The PROMPTS.TXT file is located in the \NET\HSTACC directory. A sample copy is provided
in the \NET\SAMPLE directory. This example shows the contents of the default
PROMPTS.TXT file:
Enter the number of the desired character set [1]:
-mlt.map
  Multinational (VT100/VT220 only)
  fixed
  Password:
  Enter your terminal type|(1= VT100/VT220, 2= X-terminal)[1]:
  Do you have more than one display(1=yes, 2=no)[2]:
  Enter display number [0]:
  Enter screen number [0]:
  Active X-Session in progress!| Do you want to kill it?   (1=no, 2=yes)[1]
  Killing X-Session! Please Wait...
  XPC Session Closed!
  Invalid password.|
  Sorry, XPC is busy with another session.|
  Cannot load emulator!|Xhosts not enabled or connection corrupted.|
  Session setup failed, check terminal type.|
  Fonts in `fonts.txt' are not present on this X-terminal!|
-iso.map
  ISO-Latin I (X or VT100/VT220).
  courB12
  password:
  Enter your terminal type|(1= VT100/VT220, 2= X-terminal)[1]:
  Do you have more than one display(1=yes, 2=no)[2]:
  Enter display number [0]:
  Enter screen number [0]:
  | Active X-Session in progress!| Do you want to kill it? (1=no, 2=yes)[1]
  Killing X-Session! Please Wait...
  XPC Session Closed!
  Invalid password
  Sorry, XPC is busy with another session.|
  Cannot load emulator!|Xhosts not enabled or connection corrupted.|
  Session setup failed, check terminal type.|
  Fonts in `fonts.txt' are not present on this X-terminal!|
-fix.map
  Fixed X font (X only).
  fixed
  Password:
  Enter your terminal type|(1= VT100/VT220, 2= X-terminal)[1]:
  Do you have more than one display(1=yes, 2=no)[2]:
  Enter display number [0]:
  Enter screen number [0]:
  | Active X-Session in progress!| Do you want to kill it? (1=no, 2=yes)[1]
The PROMPTS.TXT
file lists the names of character sets that remote users can use with the
XPC program (Multinational, ISO-Latin I, and Fixed X). If you have configured
screen mapping files for other character sets, add information about those
character sets to PROMPTS.TXT to allow people to select them. The file
contains messages asking the remote user to choose a character set. It
also contains the following information for each character set:
- The name of the character set
- A description
of the character set
- The default font
name
- Initial prompts
- An exit message
- Error messages
Note: A remote user
who connects to XPC might be using a different character set from the character
set used on the XPC server. For this reason, the prompts and error messages
associated with a character set can be modified by the user.
PROMPTS.TXT File Structure
The PROMPTS.TXT
file uses the pound sign (#) and vertical bar (|) characters. The # character
identifies a comment line; the | identifies a carriage return and line
feed in a prompt or error message that you want displayed on more than
one line.
Each character
set entry must be exactly 16 lines, not counting comment lines. Each message
can only be one line long. The | character must be used if part of a message
needs to be displayed on the next line on the remote screen.
Example 8-2 displays
the format of the PROMPTS.TXT entry for a character set.
PROMPTS.TXT File Format
-set.map
   character set description
   default font name
   prompt to enter the password
   prompt to enter terminal type|(1= VT100/VT220, 2= X-Terminal)[1]:
   prompt whether user has more than one display (1=yes, 2=no)[2]:
   prompt to enter display number [0]:
   prompt to enter screen number [0]:
   prompt whether to terminate active X-session (1=no, 2=yes)[1]:
   message to display while X-session is being terminated
   message indicating XPC session has been closed
   message displayed for incorrect password |
   message displayed if XPC is busy with another session |
   message displayed if emulator cannot be loaded |
   message displayed for unsuccessful session setup |
   message displayed if X-terminal lacks FONTS.TXT fonts |
The sections that follow describe the type of information required for each line.
Character Set Name and Description
XPC uses the character set name specification in PROMPTS.TXT to select the screen mapping file to use for a remote client session. Screen mapping files in \NET\HSTACC
start with a 3-digit number that identifies the code page loaded on the XPC server. XPC is able to determine which code page is currently loaded.
After the 3-digit code page number, a screen mapping filename has a dash, followed by a 3-
or 4-digit character set identifier. XPC matches these identifiers to the character set names in PROMPTS.TXT to determine which group of prompts to display for the remote client.
When a remote user first connects to XPC, XPC displays a menu of all the character set
descriptions (line 2 of each entry) from the PROMPTS.TXT file. The remote user then chooses the character set in use on the remote terminal. By combining this information with the number of the code page loaded on the XPC server, XPC can determine the name of the screen mapping file to use.
For example, if the XPC server is using code page 437 and the user chooses the Multinational Character Set, the PROMPTS.TXT entries under -mlt.map are used. The resulting
screen mapping file becomes 437-MLT.MAP, and the XPC utility uses the 437-MLT.MAP file for screen and key translations from the remote terminal.
If you add a new character set type, you must define a 3- or 4-character abbreviation
for the set, then edit PROMPTS.TXT and name the screen mapping files accordingly. For example, if the description of the character set is "MyCorporation Custom Terminal," the first two lines of the PROMPTS.TXT entry might be:
-myc.mapMyCorporation Custom Terminal
Your screen mapping
file, if you use code page 437, would be 437-MYC.MAP.
Default Font Name
The third line of
the PROMPTS.TXT entry identifies the default X terminal font. The default
font name is used only by remote X sessions.
The default font
name must be specified for all character sets. A VT100 or VT220 set can
use the default font name `None' (because each character set entry must
have sixteen lines).
A remote X terminal
initially tries to use the default font when it connects to XPC. If that
font is not available, XPC searches for a font specified in the FONTS.TXT
file. FONTS.TXT is a text file that lists the fonts available on your X
terminals, one to a line, in the order in which you want XPC to search
for them. You can use this file to list all compatible X-terminal fonts
at your site. XPC uses the first available font from the list. FONTS.TXT
is stored in the \NET\HSTACC directory.
For best results
with XPC, specify only X-terminal fonts that include all of the displayable
ASCII characters, such as the Release 3 fonts.
The default FONTS.TXT
file contains the following:
fixedcourB12a14
If you see the
following message, your X terminal does not contain any of the fonts listed
in FONTS.TXT:
Fonts in `fonts.txt' are not preset on this X terminal.
To add a font
available on your X terminal so that it can be used with XPC, you must
edit the FONTS.TXT file and add the font as in the following example (you
add a line and type the name of your X-terminal font in place of myXfont):
fixedcourBIZal4myXfont
For best results,
use a font that includes all displayable ASCII characters (such as the
Release 3 fonts). You can add as many fonts to the list as are necessary
to support your X terminals.
Prompts and Messages
The fourth through
sixteenth lines of a PROMPTS.TXT file entry supply the XPC prompts and
messages. The administrator can customize these messages for the remote
user to make them more site specific or to conform to a given character
set (or language).
Several of the
prompts request that you enter a number to select from the available choices.
You cannot change the meanings of the responses, only the text of the prompts.
You cannot define additional choices. Regardless of the text you define,
the expected responses and the choices they select remain as defined in
the descriptions below.
The prompts and
messages are as follows (text in the square brackets indicates the default):
prompt to enter the password
This text is
displayed when the remote user first connects to XPC. It requests entry
of the password established when XPC was started on the server.
prompt to enter terminal type|(1= VT100/VT220, 2= X-Terminal)[1]:
This text is
displayed to request the user's terminal type. The user presses <Enter>
or types 1 to indicate a VT100 or VT220 terminal, or types 2 to indicate
an X terminal or server.
prompt whether user has more than one display (1=yes, 2=no)[2]:
This text is
displayed only if the user has an X terminal or server. The user presses
<1> if there is more than one display, or presses <2> or <Enter> if the terminal
has a single display.
prompt to enter display number [0]:
This text is
displayed to request the number of the display for XPC to use. For a number
other than 0, the remote user types a number.
prompt to enter screen number [0]:
This text is
displayed to request the number of the screen for XPC to use. For a number
other than 0, the remote user types a number.
prompt whether to terminate active X-session (1=no, 2=yes)[1]:
This prompt is
displayed to allow the user to confirm whether the current X session should
be terminated. The user presses <Enter> to continue the session or types
2 to end the session.
message to display while X-session is being terminated
This message
is displayed to inform the user that the X session is being terminated.
message indicating XPC session has been closed
This text is
displayed after the remote user types <Ctrl>+<x> then <q> to end the XPC session.
The user's TELNET utility usually follows with a message indicating that
the TELNET session has also been closed.
The next five
messages indicate errors that cause XPC to terminate its connection to
the remote user. These messages should end with the line-break character
(|) so that subsequent messages displayed by the remote user's TELNET utility
can display on the next line of the terminal screen.
message displayed for incorrect password |
This message
is displayed if the remote user types the wrong password. (The XPC server
user establishes the password when the XPC program is started.)
message displayed if XPC is busy with another session |
This message
is displayed if a remote client with a different terminal type is already
connected to XPC. (XPC can accept a single X-terminal connection or multiple
VT100/VT220 connections, but it cannot support both types of remote terminals
simultaneously.)
message displayed if emulator cannot be loaded |
This message
is displayed if XPC is unable to load its X-terminal or VT100/VT220 program
overlay. (For X terminals, this means that xhosts is not enabled; for other
terminal types, the TELNET connection is corrupted and needs to be reestablished.)
message displayed for unsuccessful session setup |
This message
is displayed if the attempt to start an XPC session does not succeed.
message displayed if X-terminal lacks FONTS.TXT fonts |
This message
is displayed if the X terminal does not have the default font listed in
PROMPTS.TXT and also does not have any of the fonts listed in the FONTS.TXT
file. (To let this user connect to XPC, find out what fonts the X terminal
has and add them to FONTS.TXT.)